

This part is the trickiest and most important. You must create what are called tags to tell the game engine how the sabre links to other objects in the world; specifically: a Jedi's hand and the sabre blade!
The way tags work is really quite simple. You create a small triangle in one model and call it tag_XXX where XXX is any name you choose. Then you create another identical triangle in another model and call that tag_XXX as well. When the game comes to link the two object together, it aligns them so the tags overlap. Think of tags as strips of Velcro. A game character's hand isn't complex enough to "grip" a sabre properly (by wrapping fingers around the hilt) but it has a strip of Velcro slapped on the wrist. To "hold" the sabre, a character sticks the Velcro on his hand to the Velcro on the sabre. Obviously then it is important to position the Velcro (ie the tags) on the sabre correctly.
The first tag you need to create is the flash tag. This is the tag which joins the sabre to the blade of light model. You must position it at the end of the sabre so that the light appears to emanate from the weapon's tip. I'll now show you how to do it in Milkshape. You can do this in your favourite 3D modelling program if you want. For example, in 3D Studio MAX you'd create an NGon with three sides and in Maya you'd use the Create Polygon tool to make a simple triangle. You might as well do it in Milkshape though since you'll be using it to export the MD3 anyway.
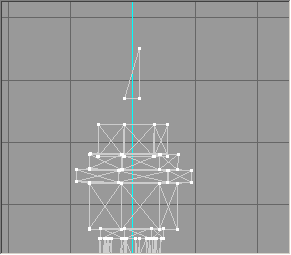
In the Front view, create a triangle as shown:

Please note that the side facing "up" is much longer than the one facing "left." This is not a coincidence. Make the triangle exactly the way you see it above.
The easiest way to do this is to press the Vertex button under the Model tab and place the three vertices. Then you can select two of them at a time (F1 enters select mode) and line them up using the Flatten command (Control+Alt+X/Y/Z). Flattening is very important! If you don't want the blade to be crooked (and who would?) you must make sure that you create a right-angled triangle and that the non-hypotenuse sides are parallel as shown.
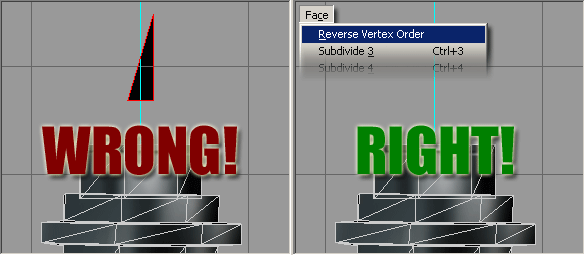
The next step is to create a face joining the three vertices. You must ensure the new face's normal faces into the screen. After creating the triangle in wireframe mode, activate shading or texturing by right-clicking in the viewport. If you can see triangle, you must flip its normal by choosing Reverse Vertex Order from the Face menu. Then it will disappear. Turn wireframe mode back on to see it.

You'll know if you get this wrong because your sabre will be pointing at the ground when you start the game!
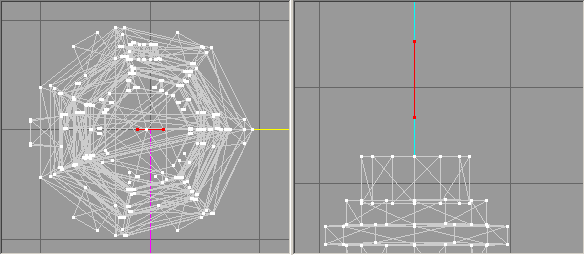
Also, use the side and top view to make sure the centre of the triangle points along the Z-axis (purple) and that it sits nicely on top of the X-axis (yellow).

Once your triangle is in position, go to the Groups tab and hit the Regroup button. Milkshape names the new group Regroup01 or some such. Rename it to tag_flash and press the rename button.
Contrary to what you may have read in some other tutorials, it does not matter what material the new group has. Once you've got this far, you're finished with the flash tag.
The other tag you can create on a sabre is the parent tag. This tag links the hilt to a character's hand. However, before you rush to create the tag, remember this:
You don't need to create a parent tag if your sabre sits at the origin in the way I described earlier!
This is because the correct location for the parent tag is where a character's wrist would grip it, and I told you to align the sabre so that it hit the origin where you would grip it. If there's no tag, guess where the GLM exporter will assume you meant to put it? That's right: at the origin.
If you really want to create a parent tag, and if you really can't be bothered to just move the whole mesh to the origin, here's how to make it:
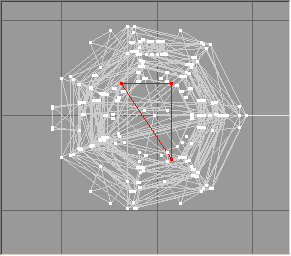
Just follow the same procedure as for making the flash tag but create your triangle in the top view.

This time, though, you must make sure you can see the new triangle in the shaded or textured views. In other words the triangle's normal must face out of the screen.
Name this triangle tag_parent.
That's it for the tags. Save your work and move on to the next section where I'll cover creating the control file and exporting the model.
| intro | part 1: Loading the model into Milkshape | part 2: Creating tags | part 3: Exporting the model | part 4: Creating the mod |
Send any comments to jk2@furrycat.net.
Please note I have configured ICQ to ignore messages from individuals not on my contact list.