

The first thing you must do is create your sabre hilt model and load it
into Milkshape. How you do this is up to you. For the purposes of this
tutorial, I have used the default sabre model provided by Raven. If you just
want to get an idea of how to go about creating a sabre mod, you can do as I
did and use Milkshape's Import Quake III Arena MD3 command to load
the models/weapons2/saber/saber_w.md3 model from
assets0.pk3. If you do this, remember that a PK3 file is just a
Zip file and can be opened in, eg, WinZip.
Aligning your model correctly relative to Milkshape's world origin will save you time and effort later. You must line up your model in the manner shown in the picture below or you won't be able to follow this tutorial. In fact it isn't necessary but I'm pretty sure that by the time you realise why I'm telling you to do this, you won't want to do it any other way!
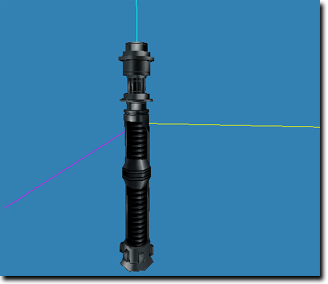
As you can see, the body of the sabre points along the Y-axis (blue). The grip face up along the Z-axis (purple) and the X-axis (yellow) protrudes out to the right of the sabre. The sabre is positioned so your character's right hand would grip the hilt roughly at the origin.
Align your model according to the diagram if you haven't already done so! Then (and only then) proceed to part two.
| intro | part 1: Loading the model into Milkshape | part 2: Creating tags | part 3: Exporting the model | part 4: Creating the mod |
Send any comments to jk2@furrycat.net.
Please note I have configured ICQ to ignore messages from individuals not on my contact list.